HTML (HyperText Markup Language) is the standard language for creating web pages.
It structures content on the web using elements like headings, paragraphs, links, and images.
Prepare your computer to write HTML by installing a code editor (e.g., Visual Studio Code) and a web browser for testing.
HTML uses opening and closing tags to define elements. Proper nesting and indentation are key to writing readable code.
Write your first HTML document with a basic structure, including <!DOCTYPE html>, <html>, <head>, and <body> tags.
The <html> tag wraps the document, <head> contains metadata, and <body> holds the visible content.
Provide information about the page, like character encoding and viewport settings.
Use the <title> tag within <head> to define the title displayed on the browser tab.
Hierarchy refers to the parent-child relationships between elements. This relationship defines how elements are structured and displayed on the page. Parent, Child, and Sibling Relationships: A parent element contains one or more child elements. Siblings are elements that share the same parent.
Use <header>, <footer>, <section>, <article>, <aside>, <main>, and <nav> for structured layouts.
Leverage <div> for block containers and <span> for inline styling or grouping.
Define headings of different levels, with h1 being the largest and h6 the smallest.
Used to add blocks of text content.
Modify text style with tags like <b> (bold), <i> (italic), <strong> (important), <em> (emphasis), <small> (smaller text), <mark> (highlight), <del> (deleted), and <ins> (inserted).
Insert a line break or a horizontal line to separate sections of content.
Display images using the <img> tag with the src
attribute to specify the file path.
Use alt
(alternative text), width
, and height
to define properties of the image.
Create numbered lists with <ol> and <li> tags. Create bulleted lists using <ul> and <li>.
Present terms and definitions with <dl> (definition list), <dt> (term), and <dd> (definition).
Use the <nav> element for navigation menus.
Create hyperlinks with the <a> tag and href attribute. Use absolute URLs for full web addresses and relative URLs for internal links.
Link to sections of a page using id and href="#id". Use target="_blank" to open links in a new tab.
Create mailto: and tel: links for emails and phone numbers.
Use <table> to create tables, with rows (<tr>), data cells (<td>), and header cells (<th>).
Add a descriptive caption to a table using the <caption> tag.
Structure tables with <thead> for headers, <tfoot> for footers, and <tbody> for the main content.
Structural attributes in HTML tables help define how the table is organized. Like colspan, rowspan, border, cellspacing and others.
Build a Student Profile Page using HTML to apply everything you’ve learned so far.
<!DOCTYPE html>
, <html>
, <head>
, and <body>
.<head>
, include a <title>
tag and give your page a title like "Student Profile".<body>
, add a <header>
element.<h1>
with the student’s name.<p>
.<nav>
section.<a>
tags linking to #about
, #hobbies
, and #schedule
.<b>
tag if desired.<section id="about">
.<h2>
and a paragraph with more info about the student.<img>
tag and add alt
text. <section id="hobbies">
.<ul>
to show the student’s hobbies.<li>
.<section id="schedule">
.<h2>
.<table>
with at least 3 columns and 4 rows.<thead>
for headings and <tbody>
for data.<tr>
, <th>
, and <td>
as needed.<footer>
tag at the bottom of the page.<a>
(e.g., a portfolio and a social profile).Use the <form> tag for gathering input. Use <input> for single-line and <textarea> for multi-line fields.
Use specific <input> types (e.g., text, email, password).
Link <label> tags to inputs using the for attribute for accessibility.
Group elements with <fieldset> and <legend>.
Use the <select>, <option>, and <optgroup> elements to create dropdown menus.
To create radio buttons, use the <input> element with the type="radio".
Ensure that all options within a group have the same name attribute, which allows only one option to be selected at a time.
Enhance user input with suggestions using <datalist>.
Include <button> or <input type="submit"> for actions.
Embed audio using the <audio> tag with supported sources.
Use the <video> tag to display videos, along with <source> and <track> tags for formats and subtitles.
Integrate external content with the <iframe> tag.
These attributes can be applied to most HTML elements to modify their behavior or appearance.
ltr
, rtl
)en
, es
, etc.)true
, false
)<input>
, <textarea>
, <form>
, etc.)These attributes are used within form-related elements to control behavior, appearance, and functionality.
.jpg
, .png
)on
, off
)<form>
<button>
or <input type="submit">
<input type="number">
text
, email
, password
, etc.)<img>
, <audio>
, <video>
, etc.)These attributes are used for embedding media content like images, audio, and videos.
auto
, metadata
, none
)<a>
and <link>
)These attributes are used for defining hyperlinks and external resource links.
_blank
, _self
)nofollow
, stylesheet
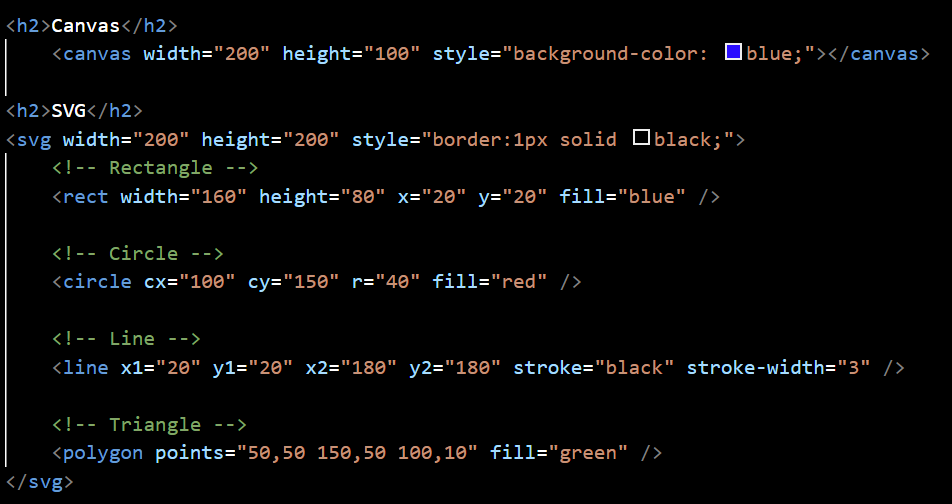
)Use <canvas> to create 2D graphics and animations programmatically.
Utilize SVG for scalable and resolution-independent graphics.
HTML entities are a way to represent special characters in your HTML code. To add symbols like copyright (©), ampersand (&), and less-than (<) signs, you can use their respective HTML entities
Icon fonts like Font Awesome or Material Icons provide pre-designed icons that you can embed directly into your HTML using a class attribute.
A favicon (short for "favorite icon") is the small icon displayed in the browser tab, bookmarks, and address bar of a website. It helps users visually identify your website. Favicons are usually square and typically 16x16 or 32x32 pixels, and it must be placed within the head tag.
Create a portfolio website for a singer by following the step-by-step instructions below:
<head>
section.required
, placeholder
, maxlength
, and autocomplete
where needed.ARIA is a specification that enhances accessibility of web content for people who use assistive technologies (like screen readers). It allows developers to add semantic meaning and behavioral information to elements that may not be natively accessible.
Common ARIA roles define the type of UI element, such as:
role="navigation"
– Marks a navigation regionrole="region"
– Defines a perceivable section of the pagerole="dialog"
– Indicates a dialog box/modal
ARIA states and properties define behavior and visibility:
aria-expanded="true/false"
– Indicates expandable elements like menusaria-pressed="true/false"
– Used on toggle buttonsaria-hidden="true"
– Hides content from screen readersaria-current="page"
– Highlights current page in a navigation
ARIA attributes help users with screen readers understand your site better. Use them responsibly:
aria-label
– Provides a readable label for elements that don’t have visible textaria-labelledby
– References another element that labels the current onearia-describedby
– Links to extra description text (often hidden)aria-live="polite/assertive"
– Announces dynamic content changes
The alt
attribute on <img>
tags describes the image for screen readers and improves SEO.
Always provide meaningful alternative text unless the image is decorative (then use alt=""
).
Many users navigate using a keyboard (Tab, Shift+Tab, Enter, Space, Arrow keys).
Make your interface keyboard-friendly by ensuring:
tabindex="0"
tabindex
and keyboard eventstabindex="-1"
to focus elements programmatically
Google Lighthouse is a powerful tool built into Chrome DevTools that helps analyze accessibility of your site.
It checks for common issues like:
To use Lighthouse:
Ctrl+Shift+I
<header>, <nav>, <main>, <section>
for
attributesrole
or HTML5 sectionsEnsure your site scales well on mobile devices with the <meta name="viewport">
tag.
Instead of using fixed widths (like width: 500px), use relative units (like percentages, vw, vh, or em).
Use the <picture> and <source> tags for responsive images.
Specify the document language using the lang
attribute.
Use the dir="rtl"
attribute to support languages written right-to-left.
Manage text direction with <bdi> and <bdo> tags for multilingual content.
Download FileZilla Client from the official website and install it on your computer.
Log in to your hosting control panel (e.g., cPanel, Plesk, DirectAdmin).
Navigate to the FTP Accounts section, create a new FTP account by entering a username, password, and directory (usually public_html
), then click create.
Note down the credentials.
Open FileZilla and go to File > Site Manager. Create a new site and enter the following:
Click Connect. If prompted, accept the server certificate to proceed securely.
After connecting successfully in FileZilla, look at the right panel — this shows the files and folders on your web hosting server.
Find and double-click the folder named public_html
. This is the main directory where your website files should go — it's also called the "root" directory. Everything you upload here will be visible when someone visits your domain (e.g., https://yourwebsite.com
).
In some hosting setups, the root folder might be called www
or htdocs
instead — they all serve the same purpose. Always upload your site files inside this folder.
On the left panel (your local files), navigate to your website folder. Select all necessary files (HTML, CSS, JS, images) and drag them into the public_html
folder on the right panel. FileZilla will begin transferring them.
Check the transfer status of FileZilla to ensure all files uploaded successfully. If any fail, right-click and choose "Requeue and Process." Also, check file permissions if necessary (644 for files, 755 for folders).
Open a web browser and enter your domain (e.g., https://yourwebsite.com). Your website should now be live! If not, clear your browser cache or double-check file placement.
Create an Accessibility Blog by following the step-by-step instructions below:
<header>
, <nav>
, <main>
, <footer>
.<a href="#maincontent" tabindex="0">Skip to Main Content</a>
.<header>
element with a main heading for the blog title.<nav>
with simple links like Home, About, and Contact.role="banner"
and role="navigation"
for better accessibility.tabindex="0"
for easier keyboard navigation.<section>
that welcomes users to the site.aria-labelledby
for the section and tabindex="0"
for important text elements.<main>
element with id="maincontent"
and role="main"
.tabindex="0"
for keyboard users.<picture>
element with <source>
and srcset
attributes to load different images depending on screen size.width="50%"
so it doesn’t fill the whole screen.alt
description for the image.<form>
with aria-label="Contact Form"
.aria-required="true"
and required
attributes.<button>
with an aria-label
describing its action (e.g., "Submit Form").<br>
tag after each input since no CSS is used.<footer>
element with role="contentinfo"
and a copyright.